iTerm2 Setup
Posted on Sat 30 January 2021 in Posts
I first was introduced to iTerm2 back around 2012, which was not coincidentally when I made the switch from a machine running Windows & Linux (dual-booting) to OSX. I didn't have a choice, the job I was working at at the time decided all devs would get shiny new Macbook Air's, and overnight I was thrust into the world of OSX. My MBA came with some software preinstalled by the ops team, and one of those pieces of software was iTerm2.
If you're an OSX user and you've never used iTerm2, you really should check it out. At this point it might've been superceded by other fancy terminal emulators, but it's still really, really good. Essentially iTerm2 is a replacement for the built in OSX Terminal app, and comes with a ton of extra features. In this post I'll outline some of the things I've done to customize iTerm2 on my dev box (this is a bit of a selfish post -- I recently changed jobs so had to go through setting it up from scratch again so this post is both "hey these are some of the neat things you can do with it" as well as "I'm documenting this so next time I don't have to figure it out from scratch"). 😄
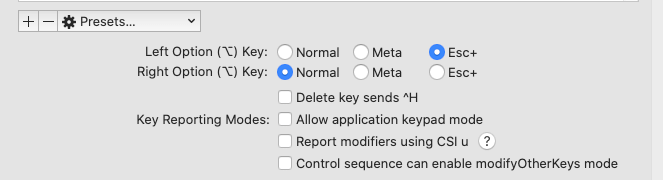
Keyboard Navigation
So the default keystrokes in iTerm are weird. I like to be able to press
⌘+left arrow to go to the start of a line and ⌘+right arrow to go to the
end of the line. Additionally I like be able to move left/right by word by
pressing ⌥+left arrow/⌥+right arrow. To set these up in iTerm's
preferences go to Profiles -> Keys, and do the following:
- change "Left Option (⌥) Key" to "Esc+"
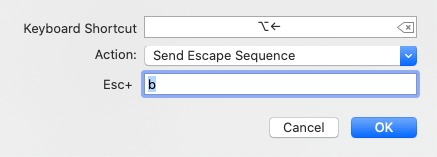
- In "Key Mappings" find the shortcut for
⌥ + ←and change the action to "Send Escape Sequence" with the value "b" - Do the same for
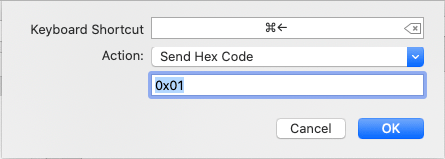
⌥ + →and use value "f" - Again in "Key Mappings" find the shortcut for
⌘ + ←and change it to "Send Hex Code" with value "0x01" - Do the same for
⌘ + →and use value "0x05"
Screenshots showing the settings:
Shell Integration
iTerm also as a special shell integration thing that gives you a number of extra commands, and allows you do do some neat tricks. Full details on how to install & some of the neat things you can do with it are on the iTerm2 website: https://iterm2.com/documentation-shell-integration.html
Some of the things I use that require shell integration are outlined below.
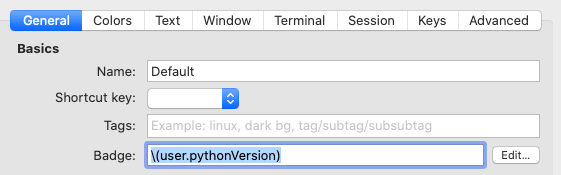
Python Version Badge
Under Profile -> General, there's a "Badge" item. This allows you to display a
piece of text at all times in the top right corner of the terminal window. It's
handy for displaying things like what branch you're currently on or similar
"contextual" items. For me because I do a lot of Python work and I'm constantly
switching between various Python virtual environments I have my badge display
the current Python version that's active. To set this up, I have the following
in my .bashrc file:
function iterm2_print_user_vars() {
  iterm2_set_user_var gitBranch $((git branch 2> /dev/null) | grep \* | cut -c3-);
  iterm2_set_user_var pythonVersion $(python -c "import platform; print(platform.python_version())");
}
What these lines do is define two user variables that can be displayed in various
spots in iTerm. My badge setting has the value \(user.pythonVersion) as you can
see here:
And then the version displays in the terminal (it's the 3.9.1 in the corner):
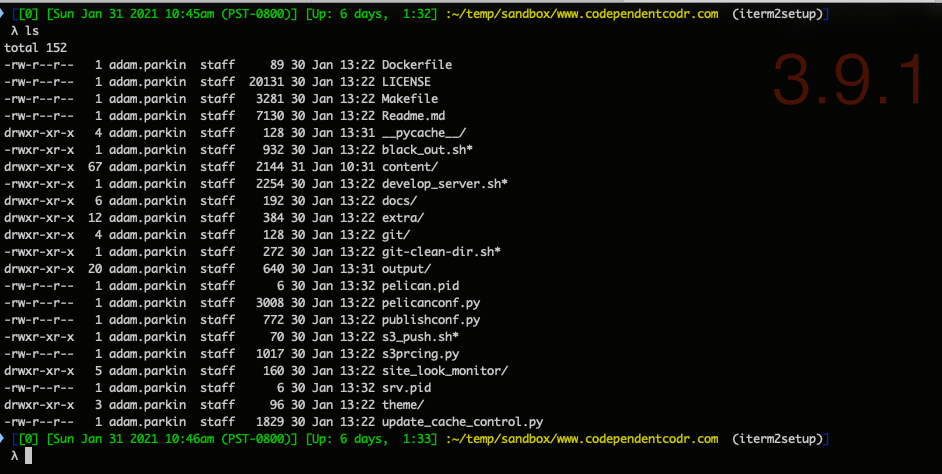
As I switch to different Python interpreters this value updates.
Marks
With shell integration on, you also get marks which the docs define as:
These are saved locations in history. They make it easy to navigate to previous shell prompts or other locations of interest.
Marks are the little blue triangle icon at the start of every line in the
terminal. With them on you can press ⇧ + ⌘ + E (or go to View -> Show
Timestamps) to see a time history of when each command was run in your terminal,
which can be handy.
You can also turn on an alert on the next mark, which is useful for when you
have a long running command. If you start a long-running command and hit
⌥ + ⌘ + A (or go Edit -> Alerts -> Alert on Next Mark) then once the command
completes you'll get a nice toast notification using OSX's notification system.
Extra Commands
Shell integration also gives a few handy shell commands, the one I use fairly
often is imgcat which allows you to view an image right in the terminal window

Status Bar
The iTerm2 status bar is also fully configurable. You can display various items like CPU load, or what your current directory is, etc. Mine displays a handful of things:

From a glance this shows me that my current battery is 72% charged, CPU is at
18%, memory utilization is at 22GB, that it's currently January 31st at 10:59AM,
that I'm in the ~/temp/sandbox/www.codependentcodr.com/content/static/imgs
directory, that my current Git branch is iterm2setup (and that there are
uncommitted changes), and that my current Python version is 3.9.1 (which is
probably redundant since that's in my badge, but 🤷).
You can configure your status bar by going to Profiles -> Session and clicking "Configure Status Bar". Here's a screenshot showing my settings:

I also configure the status bar to be at the bottom of the window (do this under Appearance -> General -> Status Bar Location)
Miscellaneous
Various other settings I turn on, mostly for minor conveniences or visual appeal.
Visual Stuff
I turn on transparency (Profiles -> Window -> Transparency). This is a setting I continually fiddle with. 😛
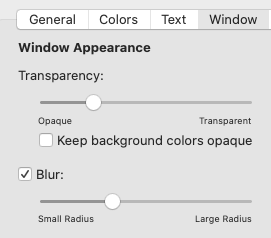
I also set these settings under Appearance -> Windows:
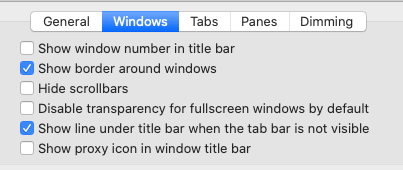
I like the border around the windows, and find the window number in title bar superfluous.
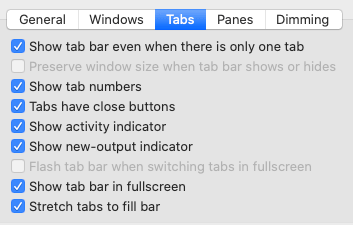
Under Appearance -> Tabs, I have:
Oddball Conveniences
Under General -> Services, I have "Check for Updates Automatically". I used to also opt into the Beta test releases, but found the update frequency annoying, so now I opt out of beta releases.
Under General -> Selection, I have the following:
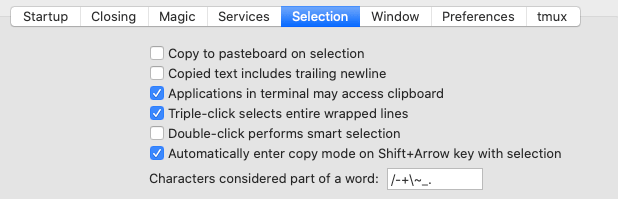
The big one on there for me is that I find the "Copy to pasteboard on selection" feature very annoying, so I turn it off.
I also under Profiles -> General -> Working Directory, have it set to "Reuse Previous session's directory". This means that whenever I open a new tab or window it opens up a terminal in the same directory I was previously in, which I find matches my workflow the best.
One last thing: I have a global hotkey set up to open/close iTerm2. This can be
set under Keys -> Hotkey -> Show/hide all windows with a system-wide hotkey.
The key I use is ⌃ + tilde, which if you're a long-time gamer you'll recognize
is basically the key combination for displaying/hiding the
console in Quake.
And That's It
Hopefully some of this might be useful for others. Even with all these tweaks and settings I barely scratch the surface of what's possible with iTerm2. At a previous job we actually used integrated Python scripts for being able to do stuff like quickly rebuild & deploy a service on a remote server by picking a menu option in iTerm2 itself. Super handy stuff.